A star topology makes networks easy to see, manage, and troubleshoot by connecting all devices to a central hub or switch. The key is clarity and simplicity — a well‑designed diagram instantly shows how devices interact and highlights potential issues. In this guide, you’ll learn how to create a clear, professional network star topology diagram that communicates your network at a glance.
What Is a Star Topology
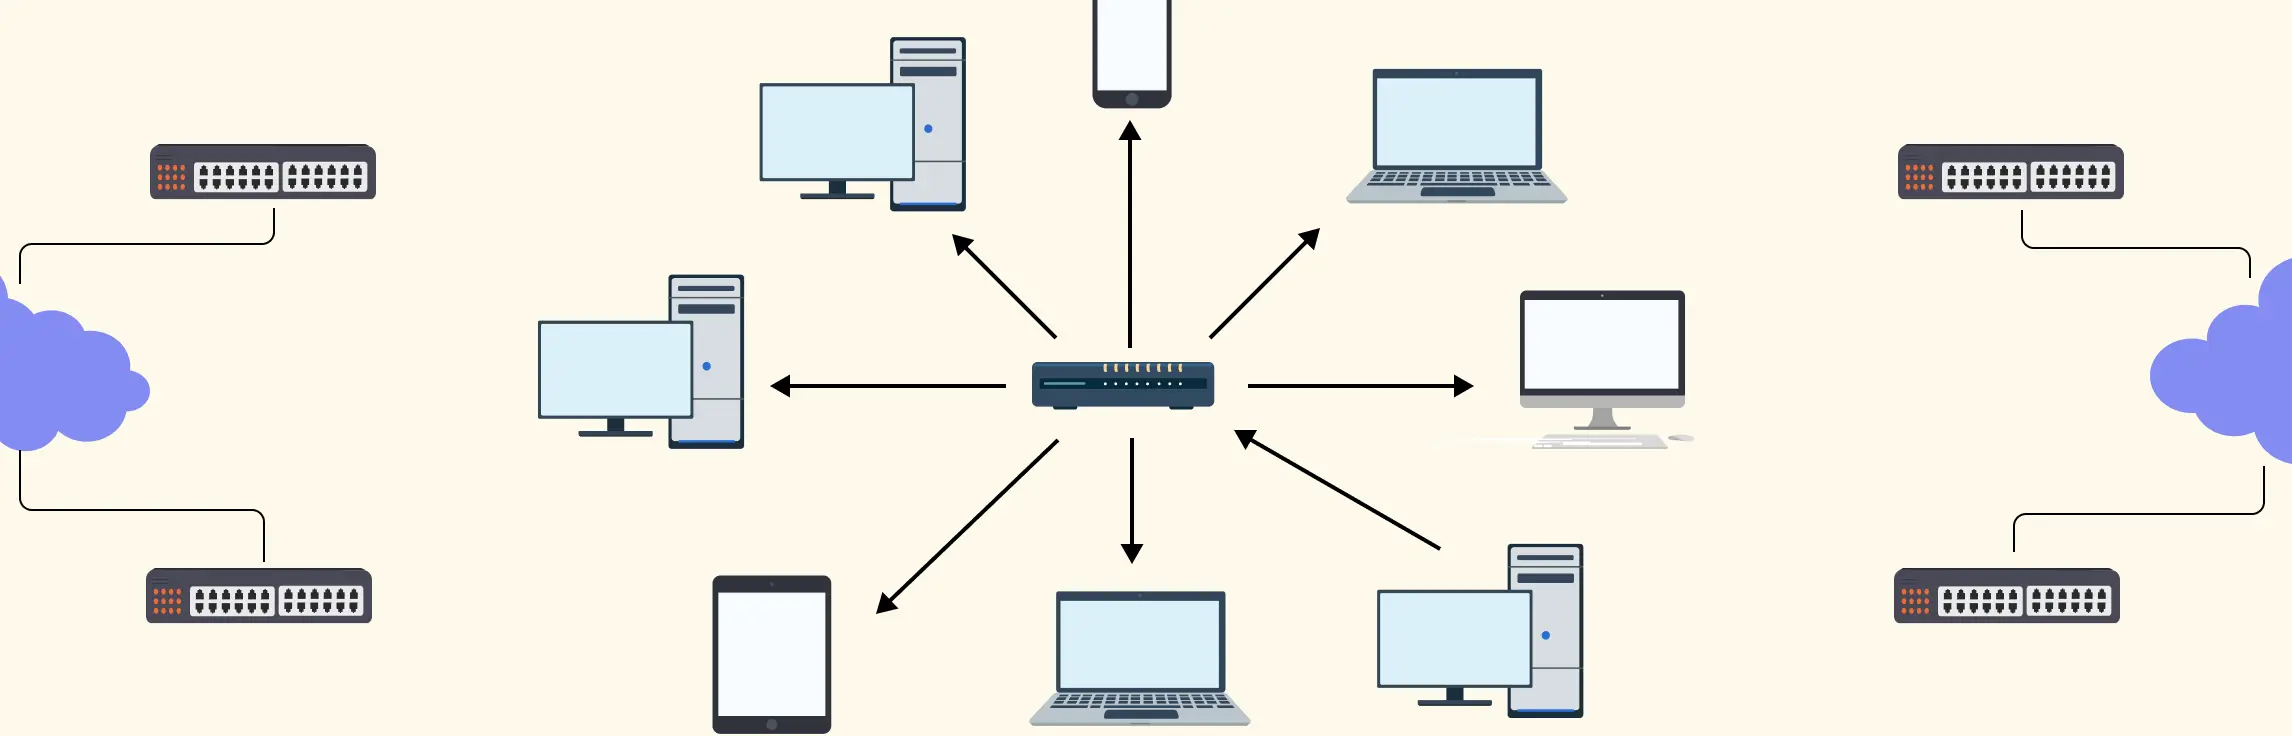
A star topology is a network layout where all devices connect directly to a central hub, switch, or controller. This central device acts as the heart of the network, managing traffic between devices so they don’t communicate with each other directly. Star topology is widely used because it keeps networks organized, easy to manage, and simple to troubleshoot. Adding or removing devices doesn’t disrupt the rest of the network, and problems can be quickly isolated. The trade-off is that the entire network depends on the central device—if it fails, all connected devices are affected.
This topology is common in office LANs, small enterprises, schools, and any environment where a reliable, manageable network is essential.
Physical vs. Logical Topology
When drawing and thinking about networks, it helps to understand two different “views”:
Physical topology refers to how devices are actually connected with cables or wireless links — the real‑world layout of your network gear.
Logical topology describes how data flows between devices, regardless of how the cables are arranged. In a star network, even if the physical layout doesn’t literally look like a star, the flow of data still goes through the central device first, which defines its logical behaviour.
Star topology is popular because this separation of physical and logical views gives designers flexibility while keeping performance and troubleshooting straightforward. It’s a practical choice for modern Ethernet‑based networks where clarity and control matter.

Key Components of a Star Topology Diagram
When you draw a star topology, the goal is to represent a real network clearly so anyone can instantly understand how it works. A well‑crafted diagram focuses on a few essential pieces:
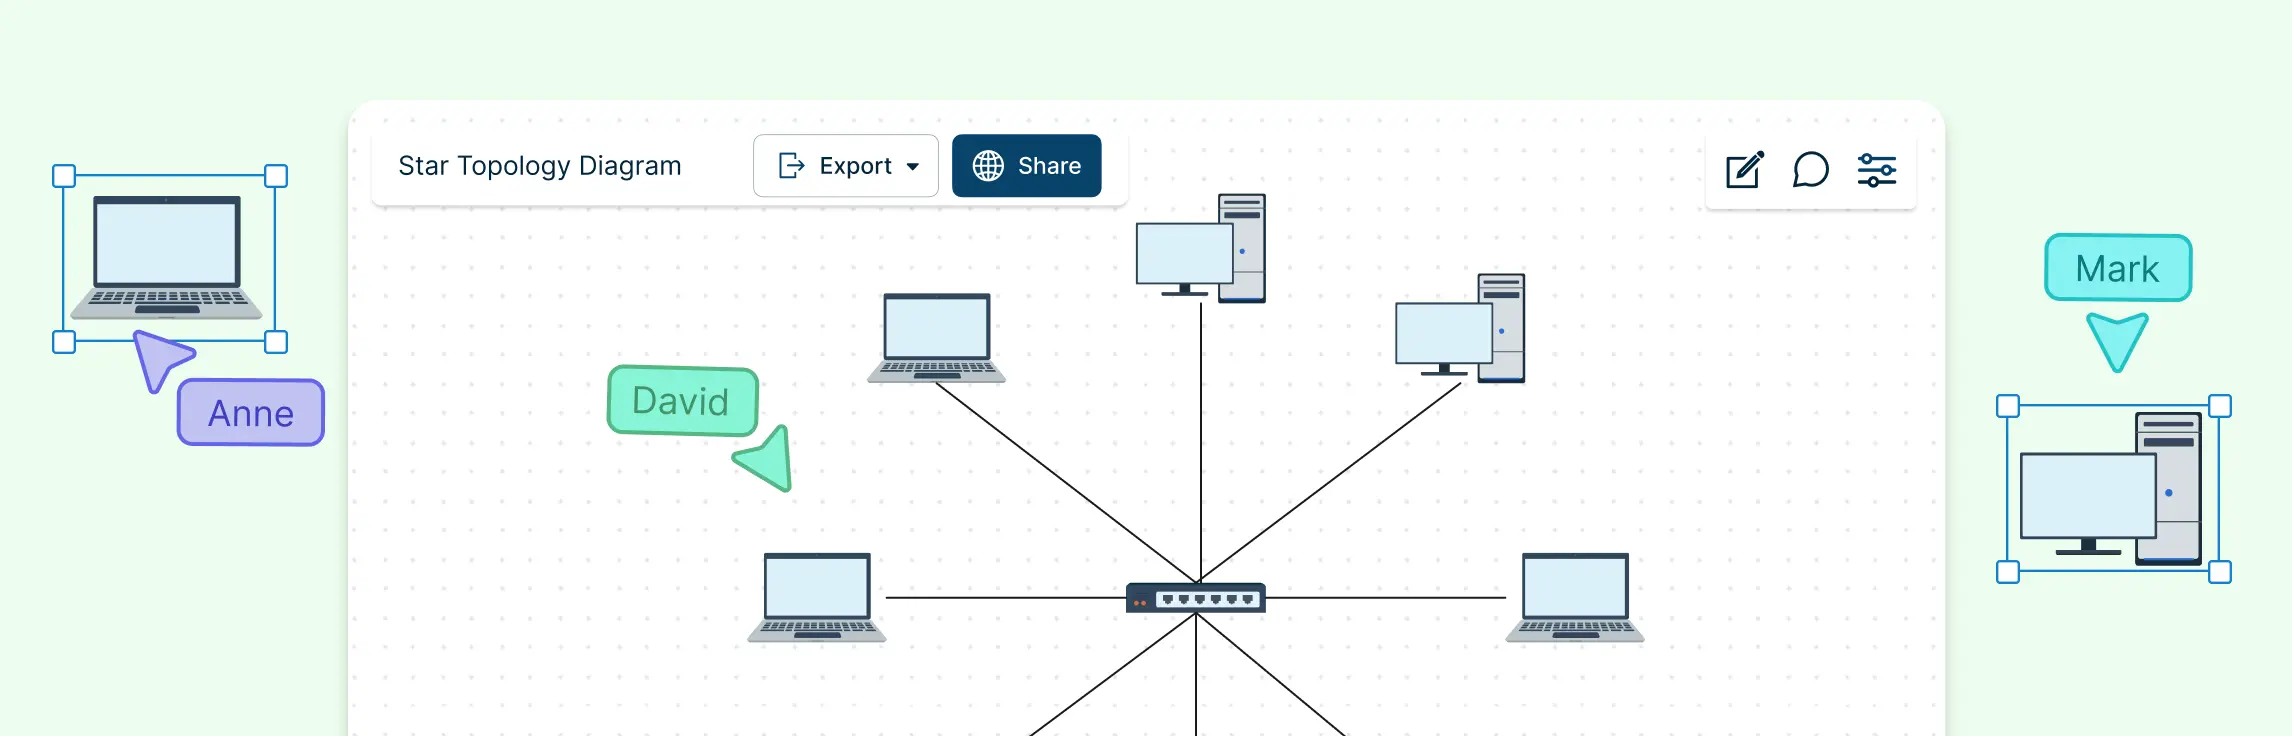
1. Central node (hub/switch/router)
This is the heart of your star topology. All devices connect back to this central point, whether it’s a network switch, hub, router, or access point. It manages all traffic on the network and is where data flows in and out before reaching its final destination. Every other element in the diagram radiates from this core, making it easy to see how the network is structured.
2. Peripheral devices (pcs, servers, printers, access points)
These are the endpoints that actually use the network. Typical examples include desktop computers, laptops, servers, printers, IP phones, and wireless access points. Each peripheral device sits at the edge with a direct connection to the central node, showing clearly how each device fits into the network.
3. Connection media (wired cables or wireless links)
Connections are the lines that link each peripheral device back to the central node. These can be physical cables like Ethernet or fiber optic lines, or even wireless links in hybrid designs. Showing the type of connection helps convey performance expectations and network layout at a glance.
4. Optional metadata (labels, IP addresses, icons, VLANs)
Adding context to your diagram makes it even more useful. This can include device labels, IP addresses, port numbers, VLAN identifiers, or simple device icons that follow standard networking symbols. Metadata helps anyone reading the diagram understand and use it for troubleshooting, planning, or collaboration.
Types of Star Topology
Star topology isn’t just a single setup — it comes in a few variations that adapt to different network needs. Understanding these types helps you design networks that are scalable, reliable, and easy to manage:
1. Basic Star Topology
The simplest form, where all devices connect directly to a single central hub or switch. It’s easy to set up and maintain, making it ideal for small offices or home networks.
2. Extended Star Topology
In this variation, multiple star networks are connected together through a central node or backbone. This allows larger networks to expand without losing the simplicity and clarity of the basic star layout.
3. Distributed Star Topology
Here, several central nodes are linked together, and each node manages its own set of peripheral devices. This approach reduces the risk of a single point of failure and improves network performance in larger organizations.
4. Wireless Star Topology
Instead of wired connections, devices connect to a central wireless access point. This type is common in modern office environments and public Wi-Fi networks, offering flexibility and reducing cable clutter.
Best Applications of Star Topology
Star topology is widely used because of its simplicity, reliability, and ease of management. Its design makes it suitable for a variety of practical applications:
Office and Enterprise LANs – Ideal for small to medium-sized offices where multiple computers, printers, and servers need to connect reliably to a central switch or hub. Easy troubleshooting and device addition make it perfect for daily operations.
Educational Institutions – Schools, colleges, and universities use star topology to connect computer labs, libraries, and administrative offices while keeping networks organized and manageable.
Home Networks – For smart homes or home offices, a star setup with a central router or switch provides clear organization and reliable connectivity for multiple devices.
Wireless Networks – Wi-Fi networks in offices, cafes, or public spaces often use a central wireless access point to connect all devices, effectively functioning as a wireless star topology.
Data Centers and Server Farms – Star topology can form the backbone for servers and storage units, allowing centralized management, monitoring, and expansion without disrupting existing connections.
Healthcare Facilities – Hospitals and clinics use star topology for connecting diagnostic machines, computers, and servers, ensuring stable and organized network performance.
How to Draw a Star Topology Diagram
Creating a star topology diagram might seem daunting at first, but with a structured approach, you can turn your network into a clear, actionable visual. Follow these steps to design diagrams that are both professional and easy to understand:
Step 1. Gather your network inventory and objectives
Start by listing every device in your network: computers, servers, printers, switches, routers, and access points. Understand the purpose of the diagram — whether it’s for troubleshooting, documentation, or planning future expansions. A complete inventory ensures nothing gets missed.
Step 2. Choose standard network symbols
Consistency is key. Use widely recognized icons for switches, routers, hubs, and endpoints. This makes your diagram instantly understandable to anyone familiar with networking standards. Color-coding devices or connections can further improve clarity.
Step 3. Define the central node position
Decide where your hub, switch, or router will sit on the diagram. Placing the central node in a prominent, central location helps ensure that all peripheral devices radiate out logically, keeping the diagram balanced and readable.
Step 4. Connect each peripheral device directly to the central node
Draw a line from each device back to the central node. Keep connections straight and avoid overlaps to prevent clutter. Each line represents a direct link, so it’s easy to follow the path of data through the network.
Step 5. Add labels and metadata
Include important details such as IP addresses, hostnames, port numbers, or VLANs. Labels make the diagram actionable, helping teams troubleshoot, configure, or expand the network quickly.
Step 6. Clean up the layout for readability
Review the spacing, alignment, and flow of your diagram. Use consistent line styles, evenly distribute devices around the central node, and remove unnecessary clutter. A neat layout ensures that anyone can read the diagram at a glance.
Step 7. Review and refine with stakeholders
Finally, share your diagram with team members or other stakeholders for feedback. Make sure it accurately reflects the network, includes all relevant devices, and clearly communicates connections and roles. This collaborative step prevents errors and improves usability.
Advantages and Disadvantages of Star Topology
| Advantages | Disadvantages |
| Easy to troubleshoot – Issues in one device or connection don’t affect the rest of the network. | Single point of failure – If the central hub or switch fails, the entire network goes down. |
| Scalable – New devices can be added easily without disrupting existing connections. | Higher cost – Requires more cabling and a central device, which can increase setup costs compared to simpler topologies. |
| Better performance – Central node efficiently manages data traffic, reducing collisions. | Centralized dependency – Performance and reliability depend entirely on the central hub or switch. |
| Simpler network management – Easy to monitor, control, and apply security policies through the central node. | Complex installation for large networks – Cabling and layout can get cumbersome as the network grows. |
| Reliable and organized – Clear structure makes network maintenance predictable and manageable. | Limited by central device capacity – The hub or switch has a maximum number of connections it can support. |
How Star Topology Compares to Other Topologies
Star topology stands out for its simplicity, manageability, and reliability, but it has different trade-offs compared to other network designs:
Star topology stands out for its simplicity, manageability, and reliability, but it has different trade-offs compared to other network designs:
Bus Topology – Bus is cheaper and easier to set up, using a single backbone cable, but it’s prone to collisions and a fault in the main cable can bring down the entire network. Star is more robust and easier to troubleshoot since device failures don’t affect the rest of the network.
Ring Topology – In ring networks, data travels in a circular path, which can make troubleshooting and adding new devices more complex. Star topology is easier to expand and maintain, though ring networks can offer predictable performance under certain conditions.
Mesh Topology – Mesh offers maximum redundancy and fault tolerance because every device can connect to multiple others. Star is simpler and less expensive, but it relies on a central node, which can be a single point of failure.
Hybrid Topology – Hybrid designs combine two or more topologies (like star-bus or star-ring) to balance performance, cost, and reliability. Star often forms the core of hybrid networks because it’s easy to manage and integrate with other topologies.
Star Topology Examples
Star Topology


Basic Star Network Topology Diagram

Topology Diagram

Star Topology Using Switch

Star Topology Network Diagram Template

Star Network Topology Diagram

Helpful Resources
Learn how to draw a network diagram step by step, from planning what to include to laying out components clearly and choosing the right symbols.
Discover key bus topology diagram elements, highlight common design patterns, and point out the limitations you need to account for when working with this topology.
Discover how a hybrid topology diagram effectively visualizes complex networks. Explore types, advantages & disadvantages, step-by-step creation tips, and best practices, plus free templates to plan, scale, and manage networks with ease.
Learn what mesh topology is, how it works, variations like full and partial mesh, and see clear network topology diagrams. Includes advantages, disadvantages, and free templates.
Understand how to approach Cisco network topology diagrams with confidence and create visuals that are practical, accurate, and easy to understand.
Learn how to create a home network setup diagram step by step, understand common layouts, follow practical best practices, and use free templates to map your setup.
Discover how to create a wide area network diagram step by step, understand key components, WAN examples, and follow proven best practices.
Everything you need to know about LANs, from the basics and key components to network types, advantages, and best practices.
Discover what a logical network diagram is, how it differs from a physical network diagram, why it’s useful, and how to create one.
FAQs About Star Network Topology
What is the importance of star topology in LAN?
How do I make my star topology diagram effective?
What tools can I use to draw a star topology diagram?
How can a star topology diagram help with troubleshooting?
What makes a star topology diagram easy to read?
Can star topology diagrams show both physical and logical connections?